
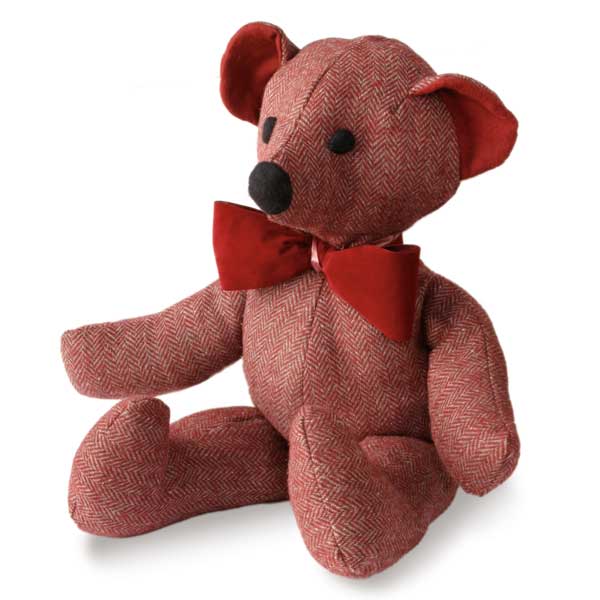
This cuddly bear is easy to make, and sure to find a fast friend.
Hundreds of teddy bears immigrated to the safety of the Atlantic Provinces and beyond with their boys and girls during the Second World War. One is immortalized in a photograph on display at Pier 21 in Halifax-designated a National Historic Site in 1996-where more than 1,000,000 immigrants first landed in Canada. Clutched in the arms of a sad looking little boy, the bear embodies the bittersweet story of a lost home and the hope that comes with arriving in a new land.
My childhood teddy bear was-and is-called Wally, and he carries a special magic because he was my mother's before me. When I inherited him he was dressed in leather gloves and boots, and woolen pants and sweater, and he became my constant bedtime companion. It didn't matter that his ear was torn and one eye was missing; I loved him and he loved me. When my son, Cameron, was born, 25 years later, Wally remained in retirement, but he fully sanctioned the making and dedication of "Winnie" as best friend for Cameron.
For my part, I thoroughly enjoyed the process of sewing Winnie-and Cameron's reception of his new companion. So, I decided to make a few more "bear hugs". Today, I've lost count of how many I've made as gifts or for sale. My parents have one who now sits beside my Wally (and my Dad's childhood teddy) in the family home in Scotland; my niece and nephews have them, my friends' children, friends of friends and the list goes on. I have made cotton flannel bears, paisley bears, tweed bears, tartan bears and harlequin bears; full-sized bears and baby bears. You will find out if you make a few that each has a different personality. I don't remember where I got the original pattern; both it and the replacement have disintegrated, and I'm using a third version-evolution happens to every species, including teddy bears. Use the pattern as it is, or modify some of the features: you can round the nose; slim the body down both in the belly and the backside; make the ears bigger or smaller, or place them higher or lower on the head. It's a simple pattern-for a very cuddly bear.
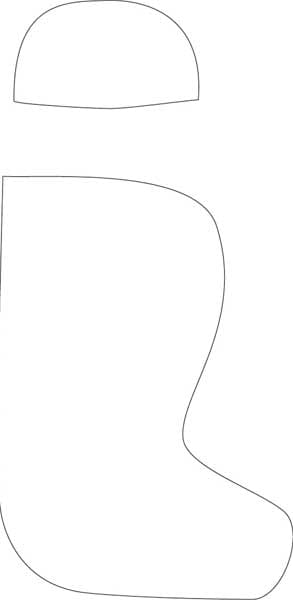
Legs and Ears

Front

Back
Materials:
- 3/4 yard of the main fabric, 60" wide, or 1¼ yards, 45" wide
- Two 4" by 6" pieces of complementing or contrasting fabric for the inner ear (cotton flannel is nice)
- 5" square of black felt
- 1 lb. polyester fibre-fill
Tools:
- Paper for pattern
- Pencil
- Scissors
- Pins
- Sewing machine or needle
- Thread to match the main fabric; black button thread
- Sharp darning needle

Step 2

Step 3

Step 5

Step 6

Step 7

Step 8

Step 10

Step 12
Step 1
On a piece of paper, scale the pattern up to size. My grown-up bears are 18" tall, and the cubs 8". You'll need to enlarge the pattern 285 per cent, so that the dimension from the top of the front pattern to the bottom (the long way on the pattern) is 18 3/4". (A copy shop can help with that.) Transfer the marks for the ear slit on the front pattern piece, and the marks for the leg tops on both the front and back pattern pieces. Also transfer the directional arrows, and the required number of each piece to be cut out, onto the patterns.
Step 2
Wash the fabric. Dry and press it with an iron (set to your fabric choice). Fold it with the two selvedges together and the fabric's pattern, if there is one, inside. (Selvedges are the finished sides of the fabric, rather then the cut ends.) Lay the pattern pieces on the cloth with the up/down arrows aligned with the warp (parallel to the selvedges). Adjust placement of the patterns to minimize waste. Pin the pieces onto the fabric.
Step 3
Cut out your pieces. The bear's arms are included in the body pattern, but you'll need to cut out his (or her) back legs separately. The legs will take two pieces each; one front and back per leg. Once the first pair of leg pieces is cut out, move the leg pattern piece over, pin it back onto the fabric and cut out the second pair. Likewise, once the first pair of ears is cut out, pin the pattern onto the inner ear fabric-which should also be double thickness, folded so that the pattern is "in". Cut out the second pair of ears.
Step 4
Transfer the ear and leg marks from the pattern pieces to the fabric. The best method to do this is with a pin through the pattern pieces-if you use a dot of ink there is a risk of having it show up in the finished bear. Place a pin to mark the ear slit on the front pattern.
Step 5
Align an ear back and an ear front, one on top of the other. You're sewing the bear inside out and then turning it right side out, so if your fabric has a patterned side remember to turn it in, so that the patterned faces are together. Sew around the outer curve of the ear. Don't sew the flat side-we still need to turn the ear right side out. Seam allowances are flexible; anywhere up to 1/4" will work. Snip notches in the outer curves of the ear so that the seams will lay flat when turned right side out. (All outer curves of the bear will have these notches snipped out of them, and all inner ones will have straight snips.) Be careful not to cut the stiches as you work. Repeat for the second ear. Turn both ears right side out and ease the seams flat.
Step 6
Check that the two front pieces of the bear are still aligned one atop the other, and pin them together on the nose and belly side. Sew from the base of the stomach to the top of the forehead, removing pins as you go. If the tension of the sewing machine foot starts to push the top fabric into a wrinkle, remove several pins ahead and realign the two pieces before continuing.
Step 7
Snip along the ear-placement mark (through both pieces of cloth) and remove the pin. Turn the bear right side out. With the inner ear facing down, pin one ear's raw edge parallel to the bottom side of this snip. Then wrap the other edge of the snip on top of the ear and re-pin so that part of the bottom edge of the ear is sandwiched between the raw edges of the snip in the head. Sew this seam making a smooth transition into the head and back; sew over the first 1/4", and end the seam 1/4" before the edge of the head. Check on the inside to make sure all the raw threads have been captured and re-sew if necessary. Next, turn the rest of the ear's raw edge parallel to the side of the head (the up-and-down line of the bear) and pin it in place. Flip the bear's forehead up. Sew the ear down the side of the head, removing the pins as you go. Repeat this exercise for the other ear.
Step 8
Check that the two back pieces are still aligned, one atop the other, patterned faces together, and pin them together down the back. Sew the seam and treat the inner and outer curves as described in Step 5. Open out the front and back pieces and fit them together, again inside out (with the pattern on the cloth facing in). Pin the two pieces together beginning at the top of the head, laying the seams flat, and continue pinning down each side to the top of the arms. Work around the arms keeping the edges together and the upper and lower layers of fabric smooth. The corners beneath the arms should line up. End the pinning at the two marked leg positions.
Step 9
Sew from one leg position all the way around the bear to the other; back sewing over the first and last 1/2". Check the underside to make sure the seam has not run off the bottom piece; re-sew if necessary. Treat the inner and outer curves as before and turn the bear body right side out. Stuff the head softly and smoothly, beginning with the nose. Stuff the neck more firmly. Stuff the arms softly and smoothly, and put the body section to one side.
Step 10
Align two leg pieces one atop the other; pin and sew them together. Snip the curves and turn the leg right side out. Repeat for the second leg. Stuff both legs softly leaving 1" at the top unstuffed. Match the front and rear seams and pin the top of the leg together. Sew with 1/2" seam allowance at the top. With the legs facing forward, start at the centre seam of the body, and pin each leg to the front piece at the bottom of the body, "seam in." Repeat for the second leg. Sew the legs on, being careful to keep the fabric of the bear's stomach smooth. Use a 1/2" seam allowance and back sew 1/2" at both edges of each leg.
Step 11
Stuff the body softly and smoothly, making an even transition at the neck and arms. Once the body is full, fold under the raw edge of the backside and lay it over the stitching that joins the leg to the body. Pin it and sew either by machine or hand. Back sew the first and last 1/2".
Step 12
To make the nose, cut a 2" square of black felt. Thread a sharp darning needle with 12" of button thread and sew an oval on the square using 1/8" stitches. Holding both ends of the thread, gather the nose into a cup shape. Tuck the edges and corners of the felt inside the cup, and pull the gathers closed as tightly as possible. Anchor the gathers with a couple of back stitches. Arrange the nose where you like it best on the bear and sew it in place, going around the whole nose, and finish it off with a couple of back stitches underneath the felt. Repeat the process for the eyes, using two 1" squares of black felt. Experiment with the placement of the eyes to get the expression you desire.
Tips: To enlarge a pattern from a grid by hand, lay out a grid of 1" squares on a sheet of paper. For the front of the bear the sheet will be approximately 20" by 14". Taking one square of the pattern in the magazine at a time, mark on your grid where the pattern line enters and exits the box. Repeat this for each square until you have finished, then join the dots. Look at the overall pattern piece and make curves smooth. Repeat for the remaining pattern pieces.
The Teddy Bear Guild of Nova Scotia celebrated the 100th anniversary of the teddy bear at the Nova Scotia Centre for Craft and Design in 2002. For more information about teddy bears and makers' clubs, check out teddybeardirectory.ca.