
An old homemade toy is reclaiming its place in the hearts of our youth-and a few older kids as well.
As a 10-year-old girl in a boy's world back in the 1950s, I could climb the knotty old maple tree with the best of them. Skinned knees and scraped elbows came with the territory. I learned to skip a pretty fine pebble across the calm waters of New Brunswick's mighty Miramichi, pop wheelies on my brother's old CCM bicycle and could even make it catwalk when necessary. Yep, I could do anything that the boys could do-including blow a sweet note on one of Old Mel's alder whistles.
Mel had been an axe handle maker by occupation and he was a pal of Granddad's. He had a speech impediment-he stuttered-and a musty odour, and no matter what the weather, this man wore every article of clothing he owned. But he was a genius with a jackknife and a master at making alder whistles.
Whistles were made during the spring, when alders are green and full of sap. An alder whistle was quite a novelty, and we were lucky kids to have a direct link to the master whittler.
Every day just after the noon or supper meal, Mel would drop by to sit and chat while Granddad worked away at his never-ending job of splitting wood for fuel. In spring we would line up daily with our friends, humbly asking for a fresh new whistle. The reply was always the same: "What did you do with the ones I made you yesterday?" Of course Mel knew that we blew them until the bark finally busted under the strain, leaving us with a faint "ssshhhh" sound.
While we waited in anticipation of our new toy, he'd slowly raise his tired body up off the old block of wood that he used as a seat and head in the direction of the brook that edged Granddad's property-alders grow in swampy areas.
Time went on. I outgrew the tomboy stage; Mel and Granddad passed on. I hadn't thought of a wooden whistle for maybe 40 years, until last year, when I stopped by my brother's for a visit. As I rounded the corner of the house I heard the unmistakable, low drawl of what had to be an alder whistle. For a split second, I swear I felt my head hurt from the elastics that Mom used to draw my hair back into pigtails when I was young and free-spirited.
There on the step of his woodshed sat my brother Allan expertly putting the finishing touches on an alder whistle. Beside him sat his grandson with a friend, playing Palm Pilot games while they waited for their whistles.
"This is the 10th one I made today," Allan said, grinning. "Every kid in the neighbourhood wants one." Mel had clearly taken the time to teach him. I reached out my hand as he passed me the finished stick, wet my lips and made that sweet whisper from long ago.
There, I thought, I can still do anything the boys can do!
DIY Whistle
Alders are found in swampy areas. Make your whistle in the spring or early summer, when the sap is running under the bark.
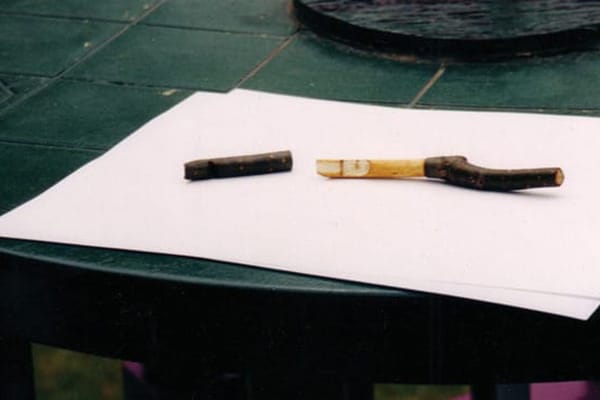
- Look for a smooth branch, free of knots, approximately 4" long and about 3/8" in diameter. With a sharp knife, make a smooth cut on a 45° angle to detach your branch from the tree. Cut the other end straight off. Square your angled cut about 1/8" in on the long side; this will keep the bark from fraying in later steps.
- About 2" from the angled end, score the bark all the way around your stick. A 1/4" farther along, repeat, and remove the bark between the cuts. This space will allow for adjustment for sound later on.
- Next cut an oval "sound hole" in the bark: 1/2" from the angled end (with the long side up) make a shallow cut across the stick, cutting through the bark and just slightly into the wood. Cut back into this from the opposite direction, making a "v" cut. Remove the sliver of bark.
- With the rounded handle of your knife, gently tap all over the surface of the bark from the angled end to the 2" cut. This will help separate the bark from the wood beneath, to be removed temporarily.
- Gently turn and pull the piece of bark off. Be careful not to tear or split the bark or you must start over. The bark will dry out quickly so hold it in your mouth and breathe through it to keep it moist.
- With the bark off, make a chamber in the top surface of the stick for sound resonance: about 1/2" farther along from your "v" cut, cut across the wood again. Make it about 1/8" deep, and deepen your first "v" cut to match. Remove the wood in between the cuts to leave a flat, shallow air chamber about 1/2" long and 1/8" deep.
- Cut a sliver off the surface, 1/16" deep, running from the angled end to the sound chamber you've just whittled. This will let the air flow through when you blow your whistle.
- Wet the stick and slide your bark back on, carefully, lining up the sound hole in the bark with the top end of your resonance chamber.
- Wet the angled end of your whistle with your tongue and blow. You might not get sound at first; just slide your bark back and forth until sound comes out. If the first whistle doesn't work, don't despair: sometimes it takes a couple of tries to get it right. Once you have mastered the craft, you can make whistles with different sounds: a longer, deeper-cut resonance chamber lowers the pitch.