Historically, people were not bound by English common laws to fence their land, but they were liable for any damage their animals wreaked on the lands of others. So of course they built miles of fences and walls to keep the animals contained.
Create a boundary- or a portal to a special place-with this traditional, maritime-style gate.
Historically, people were not bound by English common laws to fence their land, but they were liable for any damage their animals wreaked on the lands of others. So of course they built miles of fences and walls to keep the animals contained. But on this side of the Atlantic, with the sparse population and vast expanse of unoccupied land, it made more sense to fence the animals out, not in. Many times our vegetable and flower gardens were enclosed within neat picket fences, leaving the horses, cattle and sheep to roam where they would.
Gates went hand in hand with this patchwork of fences, and there were many ingenious designs. I found a couple of snow gates in an old book, one of which was wide enough for a wagon to pass through. Fitted within a strong frame it was counterbalanced by weights so that it could easily be raised to clear snowdrifts. The second, a man gate, had a hinge bar upon which the gate was raised, and the adjusted height was temporarily fixed in place with a pin through a series of pre-drilled holes.
Gates are viewed in ways other than the purely practical; their design enhances the look of your home and garden, and they can act as portals to a special place. On the northwest side of our house, we have a walled-in deck, used for gatherings on warm summer evenings. Since the street is also on this side, we have enclosed the space with a solid board-and-batten-style gate, which has a sweet curve and semi-circular detail across the top.
You can adapt the following guidelines for a (37" wide, 74" tall) board-and-batten gate to make a traditional maritime door for keeping the weather at bay, a picket gate with the boards spaced apart-or whatever you need to close off one area from another. The important woodworker's rule here is diagonals: always orient them up and away from the hinged side, then the impossible must happen for the gate to sag; the battens must get longer.

Step 2
Step 4
Step 6/7
Step 8
Step 8a

Step 10
1. Clear your workbench, and cover it with a sheet of plywood to expand your work area. Alternatively, raise the plywood up off the floor using some 2 by 4s. To make clamping easier, build your gate across the sheet, leaving the top and bottom overhanging.
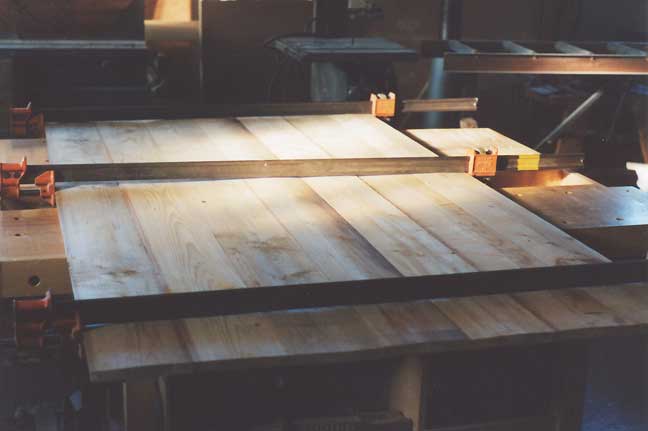
2. Lay out and dry fit the tongue-and-groove boards together. Eight of the 5 1/2" boards will give a panel that is slightly wider than the final 37" measurement. Arrange them so that any knots are in the centre of the panel. If you have difficulty fitting the tongues into the grooves you can plane their edges with a rabbet, or a shoulder plane, or use a block of sandpaper.
3. Clamp the panel together using bar clamps. No bar clamps? Make a clamping device. Screw a length of 2 by 4 at one side of the sheet of plywood. Measure 43" from this brace and screw down another piece of 2 by 4 parallel to the first. Cut a selection of hardwood wedges, with about 30° to 40° angles. Build the panel inside the clamp and tap the wedges in between the 2 by 4s and the boards to push them together. Note: Cutting the tongue or groove off the outermost board will make wedging easier.
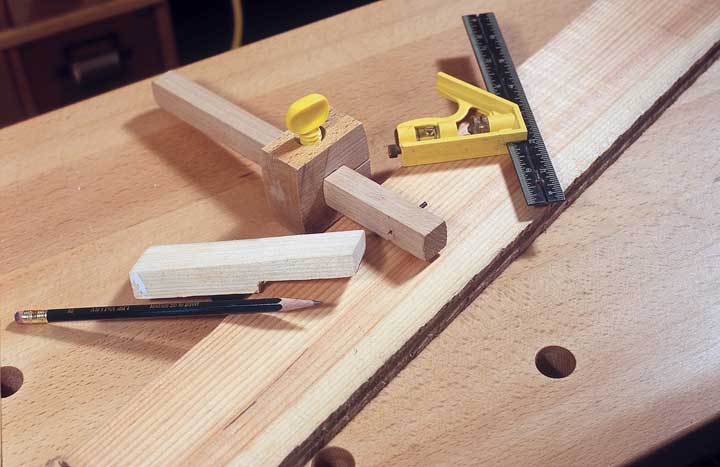
4. Number the boards sequentially. Measure the actual width of your panel. To get the required width of 37" remove equal amounts, in this case 2 1/2" from the two outer boards. (If one must be significantly narrower, it is preferable to make it the hinge-side board because that edge will be strengthened by the hinge hardware, and people won't see it as often.) There are several ways to measure and cut the boards to the appropriate width. One is simply to set the fence on the table saw the right distance away from the blade and cut the board. Another is to set a marking gauge or combination square to the correct distance and use it along the outside edge of each board. Using the saw of your choice-handsaw, bandsaw, skill saw or jigsaw-cut and then plane the edges smooth. You can make your own marking gauge by cutting a rabbet the appropriate depth in a piece of pine. Use it as a guide for your pencil along the edge of the board. Remember to clamp your work safely before trying to saw along its length. Once the boards are cut to size, replace them in the panel.
5. Use a carpenter's square or a combination square, and a straight edge or chalk line to strike a line square across the bottom ends of the boards. This is the baseline from which the other measurements are taken. Pencil an X on the side of the line indicating the wood to be cut off. Saw to the line either one board at a time, or leave them together and cut the bottoms off with a skill saw or jigsaw. Note: Masking tape along the underside will help control tear out.
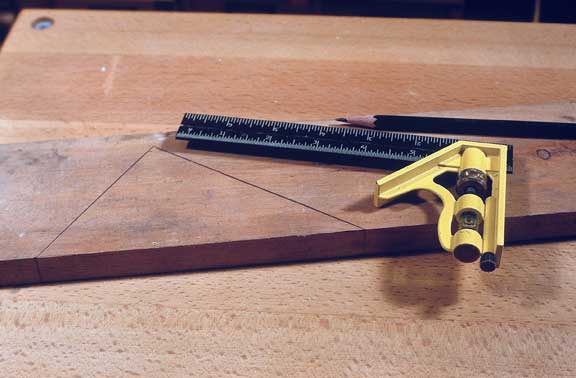
6. Measure up from the bottom, and mark on both the left and right sides: 2", 9 1/2", 30", 35 1/2", 56", 61 1/2" and 74". Join the marks across the panel using a pencil line along a straight edge. Note: If you are making a shorter or taller gate, use these numbers as a guide. Remember the batten at the bottom is wider than the upper two.
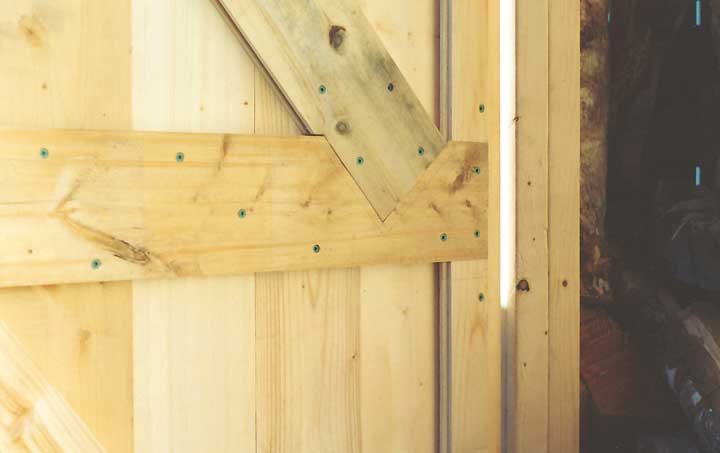
7. Cut the three battens and the two diagonals as per the cutting list (page 78). Lay the three horizontal battens across the boards in the places indicated by the pencil lines: between 2" and 9 1/2", 30" and 35 1/2", and 56" and 61 1/2". Clamp them at each end. Identify which is the hinge side and lay the diagonals in place so that they overlap the battens. Placement guidelines: (a) Orient the diagonals up and away from the hinge side making a backwards Z. (b) Lay the diagonals so that their outer corners are flush with the edges of the battens. (c) Place the diagonals about one inch in from the edges of the panel. Hold them in place and scribe a line around both ends of each, marking their locations clearly on the battens.
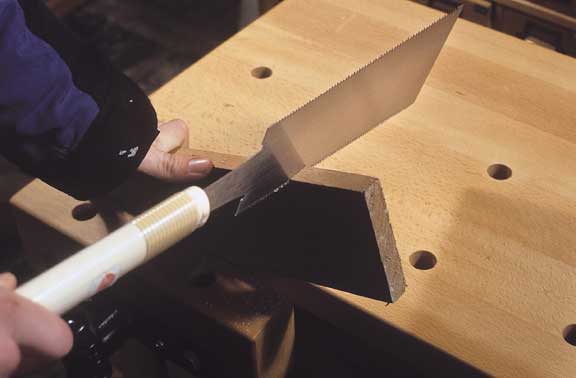
8. Taking one batten at a time, saw the notch for the diagonal out. The middle batten will have two notches. Do not worry about sawing right to the line. You can finish the cut with a wood rasp, or sanding block. Chamfer the outer edges of the battens by taking half a dozen passes with a plane. Clamp the battens back in place and slot the diagonals into their notches.
9. Drill pilot holes through each of the battens into the boards. Wrap a little masking tape flag 1 1/4" from the tip of your drill bit so that you do not accidentally drill your pilot holes through the outside face of your gate. Drilling guidelines: (a) Align the pilot holes in the middle of each of the boards to allow for expansion and contraction with the weather. (b) Zigzag their placement through the battens: if one hole is drilled an inch down from the top edge of the batten, on the next board drill a hole an inch up from the lower edge of the batten. Screw the pieces together.
10. Decide what shape you want the top of your gate to be. Do you want it to be square-topped with a cut-out of a duck, or a sickle moon like the old outhouses? Do you want a simple curve and a semi-circular detail, a diagonal, or a pointed top with a diamond cut-out? Or do you want to cut out a shape and apply it to the surface of the panel? Make some paper cut-outs of shapes and lay them in place to help you decide. Keep the cut-out 2" below the top of the gate, and reinforce the top with a narrower batten fashioned and attached in the same manner as the others-no diagonal required. Use a jigsaw to make any cuts quickly and efficiently. For an enclosed cut-out, simply drill a hole large enough in the centre of your design for the saw blade to pass through. Cut-outs can also be made using a keyhole saw. Chamfer the sides and bottom of the gate, and sand the top and the design to take any sharp edges off.
11. On a gate that swings inwards, the T-bar hinges lie on the face of the batten and the gate closes against a jamb made from 1" by 3/4" strips that run up the inside of the 2 by 6 gateposts. To attach the hinges align them on the gate, and mark the centres of the holes. Clamp some pieces of scrap wood to the front of the gate so that, when you're drilling for the carriage bolts, you won't tear out the wood around the exit hole. Use a bit that is the same diameter as the carriage bolt. Bolt the hinges on with washers under the nuts. If you find that in their best position, the hinges are not going to lay along the battens, add a couple pieces of wood to the inside of the gate to take the carriage bolt. Cut the tongues and grooves off some scrap, cut the pieces a little longer than the hinges and shape the ends if you wish. Note: Storm doors must overlay the door jamb and swing outwards, so the T-bar hinge will lie on the outside of the gate rather than on the battens.
12. Bring the gate up to height with some 2 by 4s underneath, and check that it's level. Mark the gatepost for the hinges, swing them out of the way and drill the holes into the post. Swing the hinges back into position and bolt them in place. You may need to use lag screws into the gatepost if you can't get nuts and washers onto carriage bolts. If so, determine how long a lag screw you need by the thickness of the gatepost (i.e. 2" or 3" into a 4 by 4, etc.).
13. Gate closures can be handmade or store-bought. A selection of ideas: (a) Attach a pulley or eyebolt to a sturdy upright near the opening side of the gate, and run a length of sash cord through it. Knot a clip to one end, and a heavy weight such as a bag of sand or an unused sledgehammer head to the other. Screw an eyebolt into the upper corner of the gate and clip the sash cord to it. With a bit of adjustment you will reach a counterbalanced closure. (b) Devise a turnbuckle using a branch. Screw it to the fence adjoining the gate so that it captures the gate when turned. This form of closure will work well on a woodshed door (see right), or a gate that can be reached from over the top. If it's going to be a gateway passed through often, bolting the turnbuckle with the nut and washer on the back reduces the risk of the screw unscrewing over time. Note: Removing the bark increases the life of the twig but leaving the bark on might look more decorative, in a rustic sort of way. (c) For the riggers among you: a nice quoit of rope affixed to the top of the gate that then slips over the gatepost. (d) Or go to the hardware store and see what they have in latches.
14. Paint your gate on all sides with a couple of coats of stain, oil or paint. Or leave it natural to turn silver over the next year-or two.
Materials:
- 1 sheet plywood as a work surface, or alternative
- Scraps of 2 by 4, or alternative for blocking up work surface and levelling gate
- 10 pieces of 3/4" tongue-and-groove pine, 5 1/2" wide, 6' long (minimum), or alternatively, more narrower pieces
- 1 piece of 1" pine, 7 1/2" wide, (1 by 8), 4' long (minimum)
- Box of 50 1 1/4" deck screws (minimum)
- 1 pair hinges
- 10 2" carriage bolts, nuts and washers, or 6 2" carriage bolts nuts and washers, and 4 lag screws to go into the gatepost
- Stain, oil or paint
- 8 tongue-and-groove boards cut to 74", or alternative length
- 2 battens 36" long, 5" wide (cut the tongues and grooves off one of the boards)
- 1 batten 1" thick, 36" long, 7 1/2" wide 2 diagonals 3/4" thick, 39 1/2" long, 5 1/2" wide (cut the tongues and grooves off a board-you can make these narrower if you like)
- 1 batten 2" wide, 3/4" thick for optional batten at top of gate-design will determine length
Tools:
- 3 48" long bar clamps or alternative
- 6 C-clamps
- Rabbet
- Shoulder plane, hand plane
- Sandpaper
- Saw of your choice: handsaw, bandsaw, skillsaw or jigsaw
- Screwdriver
- Marking gauge
- Combination square
- Carpenter's square 3' straight edge
- Tape measure
- Pencil
- Electric drill
- Selection of drill bits for pilot holes (small for screws; large for carriage bolts and lag screws)
- Adjustable wrench
- Spirit level
- Paintbrush
- Optional: Chalk line, Flexible batten, Wood rasp, Paper
