
Before the first backyard feast of the season, why not think about a new picnic table? Traditional in design, this outdoor furniture staple can be worth its weight in gold when loaded down with tasty treats. Our design for this popular piece of outdoor furniture has the added benefit of separate benches, allowing you the option of sliding them under the table, and out of the way, when not in use.
The following step-by-step process will give you the basic design, layout, stock sizes and measurements to produce a table-set. We'll also suggest optional touches and finishing techniques that add a bit more work but that will also make your table stand out from the rest of the picnic pack. You can build the table-set with basic woodworking skills and tools, and a weekend or two on the job.

Stock list and hardware:
2 pc of 2 x 8, each piece 8-feet long (These can be cut into 4 foot lengths and will be your table legs.)
2 pc of 2 x 4, each piece 8-feet long (These can be cut into 4 foot lengths and will be your bench legs and a stabiliser bar.)
5 pc of 5/4 x 4, each piece 8-feet long (This decking stock will be your table top, stabiliser bars and cross-ties.)
4 pc of 5/4 x 6, each piece 8-feet long (Also referred to as "decking stock" these will be used for your table top.)
2 pc of 2 x 6, each piece 12-feet long (These can be cut in 6-foot lengths and will be your bench tops.)
4 pc of 1 x 3, each piece 8-feet long (These will be used primarily for your table skirt and cross-ties.)
3 pc of 2 x 3, each piece 8-feet long (These will be used for base-beams and bench tops.)
8 pc 1/4 x 3 galvanized Carriage Bolts, each with one nut and one washer (sold separately)
6 pc 5/16 x 3 galvanized Carriage Bolts, each with one nut and one washer (sold seperately)
100 pc #8 Exterior Wood Screws 2 inches long
50 pc #8 Exterior Wood Screws 2 1/2 inches long
Tool list:
Power circular saw with an all-purpose blade
Power drill with Robertson bit
Square with 45º angle
Straight edge
Chalk line
Pencil
Adjustable wrenches or ratchet set
Table Saw (optional)
2 wood clamps
1. First Things First; The Lumber Yard Tip:
Remember that some hardware stores have contractor desks that will offer you a small discount if you request it, even if you don't sport a tool belt and steel toed shoes.
Tip: If your pick-up truck is in the shop, some pieces can be cut to help you fit them into the car. Just ask for this service.
Tip: The lowest material cost will be for "untreated" spruce lumber. Cedar, hardwoods and kiln-dried pines are substantially more expensive. "Pressure treated" lumber is mid-priced and will withstand the elements better. However, remember that this wood has had a harsh chemical applied to it-you may not wish to use it as a table-top for foods. If you want a freshly painted look, remember also that many experts advise against applying any kind of covering to this kind of wood for a few years.
Our prototype is made with untreated spruce lumber. It's the least expensive. However, much of this type of wood is often cracked, bent or loaded with loose knots. It's important, then, that you take the time to hand pick your stock from the wood-piles at the lumber yard. With patience, you'll find straight pieces that contain a minimum of knots, allowing you to produce a quality table-set. If you order wood over the phone and have it delivered unseen you'll probably be disappointed with the quality of the stock that arrives. Our tabletop is 66 inches long, 40 inches wide and 31 3/4 inches high. The benches are 58 inches long, 13 3/4 inches wide and 19 1/2 inches high. You may want your set to be a different size. Before lengthening the set, however, remember that the distance between the legs will have an effect on the strength of your tabletop or bench. You don't want the tops to have "spring" in them. Also, our design allows the bench to fit nicely between the table legs. If you're changing the height of the table or bench, experiment before cutting to be sure the bench is a comfortable height in relation to the tabletop.
The overall cost will vary, depending on where you purchase your materials, but our list was just under $105 plus tax.
Note that factory ends of lumber stock aren't always square, so make it a habit to square off all ends. Remember, too, the old saying; "Measure twice, cut once."
2. Construction Begins
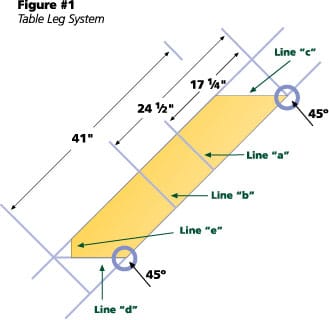
Table Leg System
Cut your two pieces of 2 x 8 x 8 stock in half. You'll be left with 4 pieces (2 pairs), each 48-inches long. Mark one of them #1, another #2 (one pair), another #3 and the other #4 (second pair). Also mark one end of each piece as the top, one end as the bottom. (This will make things easier as you progress. Make marks lightly with a pencil. You'll have to erase them later.)
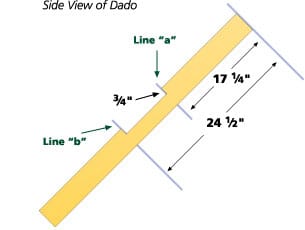
Start with pieces #1 and #3. Study the layout measurements and markings shown in Figure #1 (click here to open). On each piece, measure down 17 1/4 inches from the top and draw line "a" at 90º. Then measure down 24 1/2 inches from the top and draw line "b" parallel to line "a". Next, mark lines "c" and "d" at 45º angles from the corners, and line "e", as shown. You're now ready to make your cuts. Clamp (preferrably) each piece down and dado out between lines "a" and "b". Refer to Side View in Figure #1 (click here to open). (This is an option that will give your table a more professional and finished look. It's not required, but highly recommended as it provides tremendous additional strength.)
Use your power circular saw. Set it to cut a depth of 3/4 inch. (You'll be cutting one saw-blade-width at a time so be patient. It will pay off. Be sure to cut inside the lines and stop to test the width of your cut as you get close to the other line by laying the matching piece into the dado. It's better to be snug than to cut too much out and have a loose fit.) Complete these pieces by cutting along the other lines.
Finish forming the table legs by drawing lines "c", "d", and "e" on pieces #2 and #4. No dados are required on these pieces. Now make your cuts. As an option, we ran the legs through a table saw, cutting a 45º angle on the outside edges. This adds an interesting sightline and softens the look of the legs. See Figure #1 for an End View (click here to open) of this detail on the legs.
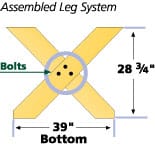
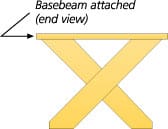
The final step is to assemble your pairs into the "x" pattern, checking for straight and level tops and bottoms before drilling pilot holes. Drill holes in a triangle pattern as shown in Figure #1, using a 5/16-inch bit, and attach with the 5/16 x 3 carriage bolts, nuts and washers. Use three bolts per pair. (Keep the nuts and washers on the inside.) See Assembled Leg System sketch above.
Bench Leg System
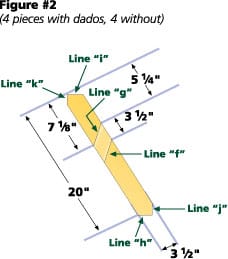
Use your 2 x 4 stock. The cutting process is very similar to that of the table legs, except that the angles are a little different, and you're dealing with four pairs of pieces. Follow the measurement markings carefully from Figure #2 (click here to open). (As with the table legs, marking the tops and bottoms, and pairing the pieces with numbers will avoid mix-ups.) Your dado this time is between lines "f" and "g" on four of the pieces. Again, take the time to make the dados tight and accurate. Cuts on the other four pieces are made on lines "h", "i", "j" and "k". There are no dados on these 4 pieces. (Making the angle cut on the outside edges, as on the table-legs, is optional. We chose not to make this cut on the bench legs.) Attach the pieces to form the legs in the "x" pattern using a 1/4-inch drill bit and two 1/4-inch carriage bolts, nuts and washers per leg.
Tabletop
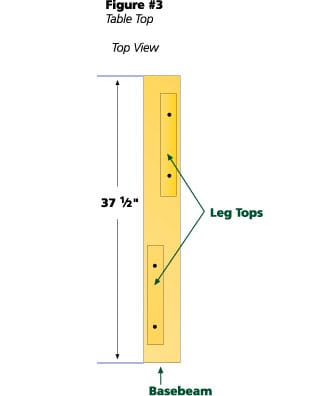
The tabletop will be screwed to a base-beam, which is attached to the top of the leg system. Figure #3 (click here to open) shows an end view of how the base-beam is placed. Using 2 x 3 stock, cut two base-beams, each 37 1/2 inches long. Using the 2 1/2-inch screws, attach one to each leg system as shown in Figure #3. See the Top View (click here to open) of base-beam attached to the top of the leg system.
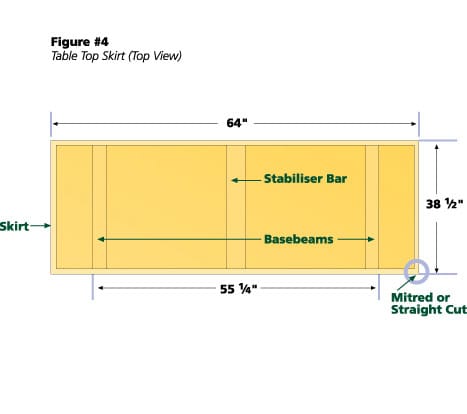
A nice option, incorporated in our design, is a skirt under the tabletop. In addition to providing a finished look, this adds strength and rigidity. Now is the time to cut and attach it. The table skirt is made from the 1 x 3 strapping stock. See Figure #4 for a top view (click here to open), showing the dimensions of the skirt. The skirt is attached to the ends of the base-beams and at its corners. These corners can be mitred or straight cut. (Mitre cuts are a bit more difficult and may not be necessary if you're going to paint your table. However, if you're going for a natural finish, the end grains of a straight cut may be more noticeable.)
Figure #4 (click here to open) also shows a stabiliser bar attached to the skirt in the centre. As its name suggests, this bar makes the top much more stable. Use 2 x 4 stock for this bar and attach it flat as shown, screwing it from the outside of the skirt with 2-inch screws. The boards of the tabletop will be screwed into the stabiliser bar.
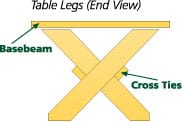
The next step is to attach the two cross-ties, that run between the two leg systems. Using your 5/4 x 4 stock, measure the distance between the leg systems (make sure they're level). Cut and attach, as shown in the Figure #5 End View (click here to open). Attach them to the legs with 2-inch screws. (Note where the ties are attached. This position is low enough to provide adequate support, while high enough to not interfere with the legs of people sitting at the table.)
We used standard "decking" material that is a full inch thick for the tabletop. This thickness offers more strength than "one-by" stock, and is not as top-heavy looking as "two-by" material. It's referred to as "5/4 decking" stock and we used the 4- and 6-inch widths. Alternate the two widths as shown in Figure #5 (click here to open). Lay out the boards, leaving approximately a 3/4 inch overhang from the side-skirt. Using the 2-inch exterior wood screws, attach the boards to the base-beam on each end of the table and to the stabiliser bar in the centre, screwing through the top down.
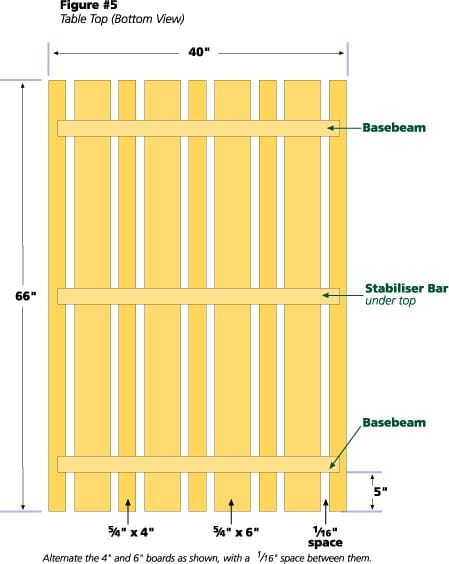
Use 2 screws per board per base-beam and into the bar. Use a chalk-line or straight edge to keep the screw heads in a straight line and leave the boards a couple of inches long when attaching. This way you can cut the tabletop ends straight after the boards are all attached. It is your design decision whether to counter sink or to leave the screw heads flush with the top. When the screws are all in, cut the lumber ends off, using your chalk-line or a straight edge to create a line that is square to the sides. Use your circular saw to cut the table ends straight, leaving a one-inch overhang of the skirt.
Bench Top
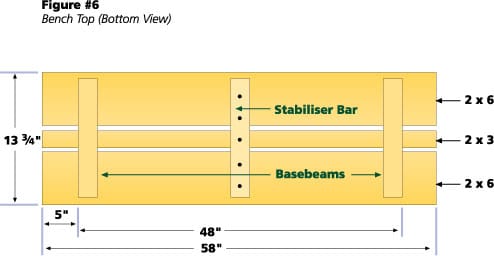
As in the tabletop, create a base-beam for each leg system. However, this time, use 5/4 x 4 stock and cut 4 base-beams, each 11 3/4 inches long. Attach them in a similar fashion to those on the table-legs using 2-inch screws.
Alternating the 2 x 6 and 2 x 3 stock, create the bench tops as shown in Figure #6 (click here to open). Cut them all 58 inches long and lay them out. We left approximately 1/8 inch between the boards. Screw them to the base-beams from the top down.
Turn the bench over and attach a stabiliser bar on the underside of the three top boards in the centre. Cut the bar 11 3/4 inches long using 5/4 x 4 stock. See Figure #6 (click here to open). Screw through the bar and into the top boards using 2-inch screws. Measure, cut, and attach a cross-tie to each bench using 1 x 3 strapping stock. (Two ties will match the table, but one is probably enough.)
Worth Noting
If you're using lumber with a high moisture content, your boards shouldn't crack or split when you screw into them. However, with small-dimension lumber, you may have to pre-drill before inserting the screws. Any cracking or splitting will weaken joints considerably so take the time to pre-drill if necessary.
When it comes to measurements, don't worry if you're an eighth or so off when comparing your cuts to ours. This is normal with this type of project and lumber. Just be sure that everything sits flat and that tops are level before final attachments.
3. Finishes
Tip: Give your set longer life by applying a wood preservative to the bottom few inches of the legs. They will always be exposed to moisture from the ground they sit on; the preservative will slow the deterioration process.
You have many options for finishing touches. Before applying any finish, sand the wood to smooth it.
a) Paint
If you paint you must prime with a shellac primer to seal the knots. Two coats are best, otherwise the knots will show through your paint. We suggest also taking the time to counter-sink the screws and filling the holes with putty. Use a high quality latex or oil exterior paint. Experience teaches that it is a smart investment to pay a bit more for paint. If your table-set will be exposed to bright sunlight for long periods of time, it is also wise to remember that dark colours fade more quickly.
b) Natural Finish and/or Stain
If you are applying a natural finish or stain, choose a product intended for exterior use. Oil based varathanes will give your wood an amber colour. You'll need plenty of ventilation while applying the stain, and drying time is long. Water-based products will dry more quickly, and clear. You'll still need good ventilation, though.
Bon Appetit!
If you can't find the time to take on a picnic table-set project such as this one, your other option is to look for pre-cut, assemble-it-yourself kits that usually start appearing in stores around this time of year. Then again, there's always the option of buying a set already assembled and finished, and even having it delivered. All you need is a spot to put it, and a picnic to eat on it.